Bottom Mount vs Back Mount Pressure Gauge: Which Do You Order? (2026)
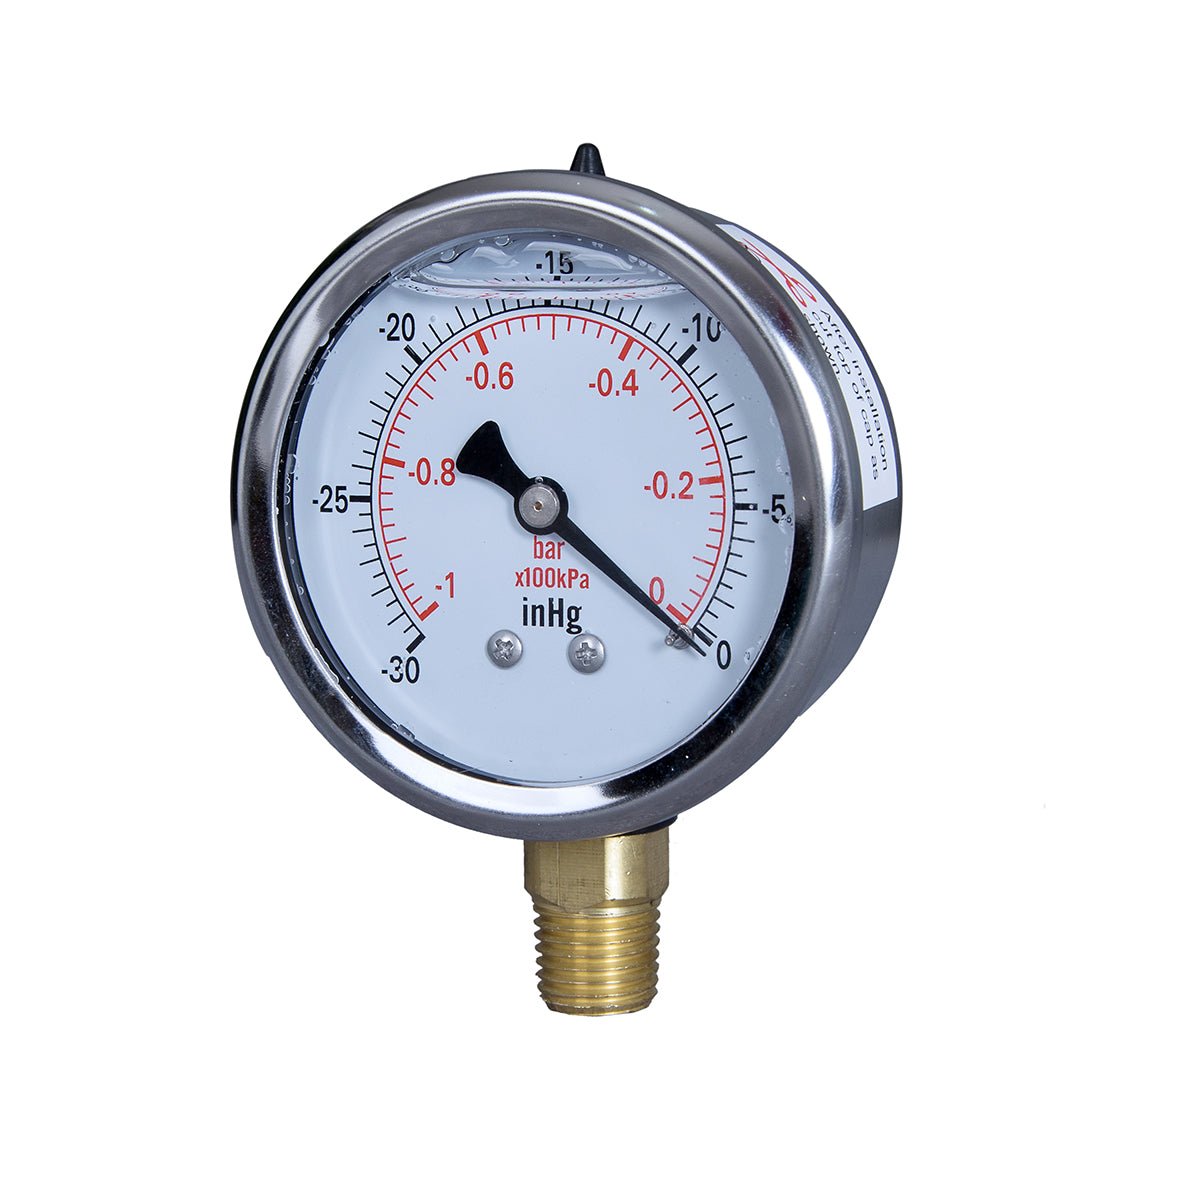
JIVTORule of thumb: if the gauge screws into a pipe or tee and stands upright above the line, order a lower mount (also called bottom mount). If the gauge sits flush in a panel, against a tight wall, or on a manifold block whose port faces rearward, order a back mount. Same dial, same movement, same accuracy — the only thing that changes is where the threaded stem enters the case, and that single detail decides whether your install goes together cleanly or not at all.
This matters more than buyers expect because the two versions are sold as separate SKUs. A lower mount gauge physically cannot sit flush against a panel — its stem sticks out of the bottom of the case, pushing the dial inches off the surface. A back mount gauge cannot stand upright on a vertical pipe run without an awkward bracket. At JIVTO, wrong-position orders are consistently our most common return reason for panel builds, which is why this article exists: pick correctly the first time.

Key Takeaways
- Lower mount = bottom mount. The two terms mean the same thing: the 1/4" NPT stem enters at the 6 o'clock position under the case.
- Back mount means the stem enters at the rear (center) of the case, so the gauge body can sit flush against a panel or wall.
- Pipe and tee installs → lower mount. Panel, tight-wall, and rear-port manifold builds → back mount.
- Connection position changes installation geometry only — it does not affect measurement function or accuracy class.
- Before ordering, check the port orientation where the gauge will live; that one check prevents bent stems, stressed cases, and unreadable dials.
What the Difference Actually Is: Where the Stem Enters
The physical difference takes one sentence to state and one image to understand. On a lower mount gauge, the threaded connection extends downward from the bottom of the case at the 6 o'clock position. On a back mount gauge, the threaded connection projects straight out of the back center of the case at the 9 o'clock axis of the dial's plane. That's it — everything else about the two gauges (Bourdon tube, movement, dial, liquid fill) is functionally identical (Boshart).
   LOWER MOUNT                    BACK MOUNT
      ┌─────┐                      ┌─────┐
     ╱       ╲                    ╱       ╲
    │  DIAL   │                  │  DIAL   │──╫── ← stem enters
     ╲       ╱                    ╲       ╱        from REAR
      └──┬──┘                      └─────┘
         │                              ↓ flush against panel
         ▼                            ─────────
      screws onto                   panel / wall
      pipe or tee
Because the stem location defines the geometry, it also defines what the gauge can do in an install:
| Feature | Lower (bottom) mount | Back mount |
|---|---|---|
| Stem entry point | Bottom of case (6 o'clock) | Rear center of case |
| Gauge stands upright above a pipe? | Yes — natural fit | Only with brackets; unnatural |
| Sits flush against a panel? | No — stem pushes case off-panel | Yes — designed for it |
| Panel mounting hardware | Not applicable | U-clamp or front flange kits |
| Typical port type | Threaded tee on vertical pipe | Recessed/rear-facing manifold port |
One terminology note before you shop: "lower mount" and "bottom mount" are the same product. Suppliers use the terms interchangeably (some also write "LM" vs "BM" in part codes). If you search for a bottom mount pressure gauge and find listings labeled lower mount, those are the item you want — don't keep hunting for a third option.
If you're still decoding full spec lines rather than choosing between two SKUs, the mount field is field #3 of six in our guide to how to read a pressure gauge spec sheet, right after the connection size.

When Lower Mount Wins: Pipe Runs, Tees, and Pump Discharge Lines
Choose a lower mount pressure gauge whenever the gauge threads directly onto plumbing that runs vertically below it (BCST). The stem becomes the support column; gravity and thread engagement do the rest.
Typical scenarios:
- Air compressor tanks and lines. The gauge screws into a threaded boss or tee on top of the tank and reads upright. This is the classic lower mount application — it's why nearly every compressor gauge you've seen has its stem underneath.
- Hydraulic power units. A tee between pump outlet and valve stack gives the gauge its own upright perch. Our guide to liquid filled hydraulic pressure gauges covers why the glycerin fill matters on these pulsating lines.
- Water well pressure tanks. The tank tee presents a vertical port; the gauge rides above it at eye level.
- Test rigs and skids built from pipe fittings. Anywhere a fitting can be oriented to present an upward-facing port, lower mount keeps the build simple — no brackets, no adapter elbows.
The pattern in all four: the mounting point is the process connection. One part does two jobs. That simplicity is exactly why lower mount remains the default for general industrial service worldwide.
When Back Mount Wins: Panels, Tight Walls, and Manifold Blocks
Choose a back mount gauge whenever the space behind the dial is occupied but the face must remain visible — or when the port itself faces rearward.
Typical scenarios:
- Flush control panels. The gauge passes through a cutout and the case sits proud of the panel face by design. A U-clamp bracket (threaded over the rear-projecting stem, tightened against the inside of the panel) holds it secure; a front-flange version hides under a bezel for a fully flush look. Searching for a "back mount gauge panel" kit usually turns up exactly these accessories.
- Tight clearance behind equipment. When the gauge must hang on a wall or machine surface with only millimeters behind it, a bottom stem would force the whole case forward and leave the stem exposed to impact. Back entry tucks everything flat.
- Manifold blocks with rear ports. Instrument manifolds often drill their gauge ports through the back face. A lower mount gauge would need a 90° elbow and stick sideways; a back mount threads straight in, dial facing the operator.
- OEM enclosures and switchgear. Anywhere the builder wants the dial visible on a finished surface with no visible plumbing, back mount plus a clamp is the clean answer.
What we see in returns: the most common failure isn't a defect — it's geometry. A buyer orders a lower mount for a panel build, discovers the stem won't let the case reach the panel face, and either forces the install (bent stem, cracked case) or ships it back. Measure which way your port faces before you click buy.
Quick-Decision Table: Your Install → the Mount to Order
Find your situation in the left column; the right columns tell you which SKU solves it and what accessory completes the job.
| Your installation | Order | Accessory needed |
|---|---|---|
| Vertical pipe run, tee, or tank boss with upward port | Lower mount | None — thread sealant only |
| Flush control panel cutout | Back mount | Rear U-clamp bracket (or front-flange bezel) |
| Wall/machine surface with minimal rear clearance | Back mount | U-clamp or adhesive/screw base as applicable |
| Manifold block with rear-facing gauge port | Back mount | None — direct thread-in |
| Horizontal pipe run | Either, via a vertical tee fitting | Tee fitting; then follow the row above |
Two edge cases worth naming:
- Horizontal pipes. Neither mount threads directly onto a horizontal line and reads upright. Add a tee so the gauge branch points up, then treat it as a vertical run (lower mount).
- Panel + long stem needs. Some deep panels use extended-stem lower mount gauges ("stem extensions") instead of back mount. This is a niche OEM solution; for standard panels, back mount is simpler and cheaper.
Ordering Checklist: Four Fields Before Checkout
Connection position is one of four fields that define a complete gauge order. Confirm all four and you'll never send one back for fit reasons:
- Dial size. 2" (50 mm) fits compact manifolds and OEM panels; 2.5" (63 mm) is the general-service standard readable across a workshop.
- Range. Normal operating pressure should sit in the middle third of the scale (~25–75% of full span); cyclic loads toward the lower end of that band.
- Fill. Glycerin-filled cases damp needle flutter on pumps and compressors; dry cases suit steady, low-vibration service. The tradeoffs are compared in oil filled vs dry pressure gauges.
- Position. Lower/bottom mount for pipe-and-tee builds; back mount for panels, tight walls, and rear ports. You now know how to decide this — it was the rule of thumb in the first sentence.
Then sanity-check the remaining spec fields (connection size/thread, accuracy class) using the spec sheet reading guide so the quote you receive matches the gauge you pictured.
Both Positions, Factory-Direct: Pick Your JIVTO SKU
Both configurations exist as separate stock items, factory-direct from Yueqing with 15+ years of manufacturing history:
JIVTO 2.5" Liquid Pressure Gauge – 1/4" NPT LOWER mount (bottom entry). The pipe-build workhorse. Glycerin-filled 2.5" dial, 1/4" NPT stem at the 6 o'clock position, dual psi/bar scale. Order this for compressor tanks, hydraulic tees, well systems, and any vertical run where the gauge stands above the line. A 2" version is available when panel real estate is scarce.
JIVTO 2.5" Pressure Gauge – 1/4" NPT BACK mount (rear entry). The panel and manifold specialist. Same dial size, range options, and fill — with the 1/4" NPT stem projecting from the rear center so the case seats flush against panels and blocks. Pairs with U-clamp brackets or front flanges for through-panel mounting.
Not sure which fits after measuring your port? Send us your installation details — port orientation, panel depth, and target range — via our Request a Quote page and we'll confirm the correct configuration before you commit.
Frequently Asked Questions
Are bottom mount and back mount pressure gauges interchangeable?
No — they're separate products, and swapping them changes the install geometry completely. A lower mount gauge cannot seat flush against a panel because its stem occupies the space beneath the case, and a back mount gauge cannot stand upright on a vertical pipe without custom bracing. In rare bench-top or test-rig situations either could be made to work with adapters, but "made to work" usually means stressed stems and crooked dials. Buy the position your port demands.
Does the connection position affect accuracy?
No. Connection position is purely mechanical — it changes where the stem exits the case, not how the Bourdon tube senses pressure or how precisely the movement translates that to the dial. A Class 1.6 lower mount gauge and a Class 1.6 back mount gauge are equally accurate; accuracy comes from the movement quality, not the entry point. Position affects installation, never measurement.
Why is it called "lower mount" if I searched for "bottom mount"?
Regional and supplier vocabulary differ: North American catalogs lean toward "bottom connect," while many Asian and European manufacturers print "lower mount." They describe the identical product — stem entering the bottom of the case. Reputable suppliers list both terms so searches for either find the right SKU.
Can I convert a lower mount gauge to a back mount with fittings?
Technically an elbow fitting can redirect the stem 90°, but we don't recommend it as a substitute for ordering the right position. An elbow adds a leak point, offsets the dial from the panel, and leaves the case unsupported at an angle — the exact "stressed case, unreadable dial" outcome this article exists to prevent. Fittings are fine for routing pipe; they're a poor substitute for the correct case geometry.
Conclusion: Check the Port, Then Order
Bottom mount vs back mount pressure gauge isn't a performance debate — both deliver identical readings from identical internals. It's a fit question with a fit answer: upright on a pipe means lower (bottom) mount; flush on a panel or wall means back mount. (GaugeInChina) Look at where the port faces, match it to the stem position, confirm the other three fields (dial size, range, fill), and the order arrives ready to install. For everything else that goes into choosing a gauge — ranges, fills, accuracy classes, and materials — the complete liquid filled pressure gauge buyer's guide picks up where this decision ends.